Multiple pod remote access - brainstorming
Project Overview
This document explores how the admin panel will connect to the multipod from the internet remotely. We will also be including the current functions of the Admin Panel and associated screens we are using in our first iteration of our Application using Home Assistant as our native backend.
Problem Statement
Basically we have two problems to solve:
- Allow pods owners to manage multipod remotely.
- Allow OB Admin to access pods based on user permission.
Home Assistant is a local installation on your home server. So the Home Assistant server(and its add-ons) run on your localhost network. Home routers don’t have a static public IP address. So it is not possible to login to Home Assistant server from remote locations.
So the user can install NabuCasa or SocketXP. This solves the problem of accessing home remotely for a single user and a single home instance, but what about multi-homes or multi-users?
NabuCasa has a solution for managing a single instance with multi-users. But what about managing multi-instances with single or multi-users. Check this issue on GitHub.
Multiple pods remote access
We need to be able to connect multiple pods on different networks. There are many ways to do so.
- VPN
- MQTT
- WebSockets
- SSH Tunnel
- Connect on-demand, (open internet port)
- Connect on-demand, with OB gateway host, (internet open only to OB IP address)
- Another possible way to bridge devices on two different networks
The discussion here, here and here may help.
VPN
If we have a VPN connecting the network in instance 1 to instance 2 network, then we may be able to bridge the two brokers directly. I’m considering using Zerotier for this purpose because it seems like the easiest to implement.
MQTT
We will need a ‘middleman’ MQTT Broker in the cloud. Two bridges are created:
Instance 1 broker <--bridge--> Cloud broker <--bridge--> Instance 2 broker
The ‘bridge’ is just software configuration. We instruct the first broker to share topics with another broker. Example of Configuration.
https://www.home-assistant.io/integrations/mqtt/
There are free cloud-based MQTT services available but the ‘free tier’ usually does not offer bridging. For example, CloudMQTT’s free ‘Cute Cat’ plan doesn’t allow bridging but it is available in their cheapest paid plan. adafruit.io 1 offers a free cloud-based MQTT broker but I can’t find anything in their documentation that discusses bridging.
We must be sure to use SSL to secure the communications between local and cloud-based brokers.
The following threads discuss connecting a local MQTT broker to a cloud-based broker:
This thread discusses bridging to Adafruit.io 2’s MQTT broker as a means of providing free SMS from IFTTT. Bridging is discussed about halfway through the first post.
However MQTT (Either statestream or eventstream) requires you to set up each and every device manually on the master. But there is automation code. Check this and this.
WebSockets
Home Assistant contains a WebSocket API. This API can be used to stream information from a Home Assistant instance to any client that implements WebSockets.
Implementations in different languages:
- JavaScript - powers the frontend
- Python - CLI client using asyncws
- JavaScript/HTML - WebSocket connection in your browser
I don’t know how exactly this could enable us to connect multi-instances together. But there is a pull request they say on forms that is working. Here, but it is not merged to the core code yet.
Documentation of WebSockets API of HA.
SSH Tunnel
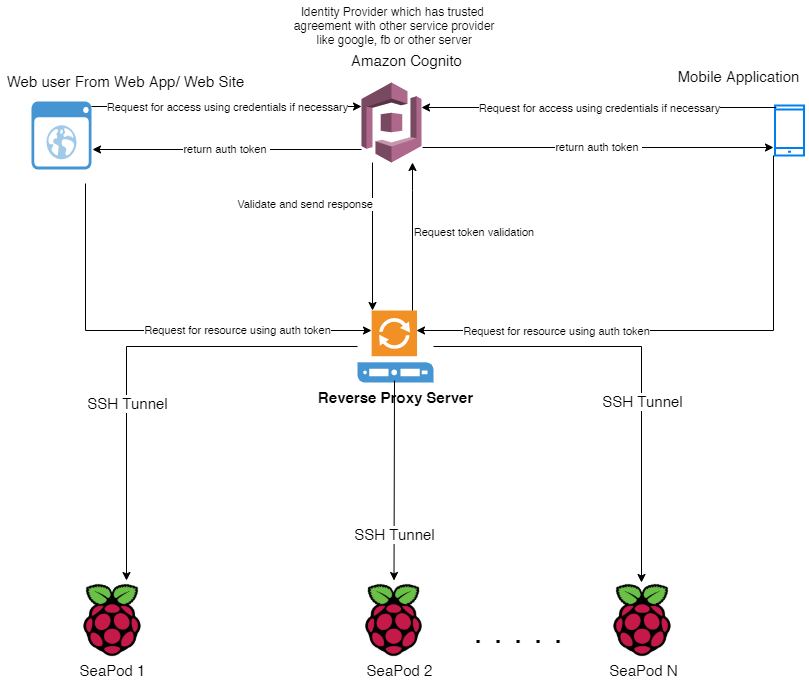
According to Home Assistant Documentation:
Use a USB drive formatted with FAT, ext4, or NTFS and name it CONFIG (case sensitive). Create an authorized_keys file (no extension) containing your public key, and place it in the root of the USB drive. File needs to be ANSI encoded (not UTF-8) and must have Unix line ends (LF), not Windows (CR LF). See Generating SSH Keys section below if you need help generating keys. From the UI, navigate to the Supervisor system page and choose "Import from USB". You can now access your device as root over SSH on port 22222. Alternatively, the file will be imported from the USB when the Home Assistant OS device is rebooted.
For SSH, you will have to install it. Before you can start it, you will have to have a private/public key pair and store your public key in the add-on config (see docs for more info). Once started, you can SSH to Home Assistant and store your custom add-ons in "/addons".
Another possible way to bridge devices on two different networks
The SmartThings integration was introduced in Home Assistant. Its IoT class is Cloud Push. You can find the source for this integration on GitHub.
https://www.home-assistant.io/integrations/smartthings/
Admin dashboard
- We can create an add-on ? If we manage to allow a user to manage multi-uses this will be easy.
- Web or Mobile?
- Also include pod user DB to OB user DB.
- Figma File of Admin Panel https://www.figma.com/file/z1PJbb1IwA32OKek0WkmuN/OB-Control-Panel